Author Topic: Stop.... It's hammer time: New power hammer!  (Read 43784 times)

0 Members and 1 Guest are viewing this topic.

Offline turnnut

  • Hero Member
  • *****
  • Posts: 1861
Re: Stop.... It's hammer time: New power hammer!
« Reply #45 on: August 13, 2016, 09:10:11 PM »
 when I mentioned about boring out the I.D. of a pulley on the lathe,  I should of also made note of an easier way.

 in the drill press,   if it has a 5/8 inch I.D. put a  5/8" drill in the press, slide the pulley on the bit and clamp down in position,
 you now have it centered.   I would first use a 11/16" bit, then go to the 3/4".

 then remember to run a tap thru the locating hole to take off any burrs.

 just a suggestion, you may have already done rebores this way.  Frank

Offline Twilight Fenrir

  • Hero Member
  • *****
  • Posts: 547
Re: Stop.... It's hammer time: New power hammer!
« Reply #46 on: August 14, 2016, 03:38:54 PM »
when I mentioned about boring out the I.D. of a pulley on the lathe,  I should of also made note of an easier way.

 in the drill press,   if it has a 5/8 inch I.D. put a  5/8" drill in the press, slide the pulley on the bit and clamp down in position,
 you now have it centered.   I would first use a 11/16" bit, then go to the 3/4".

 then remember to run a tap thru the locating hole to take off any burrs.

 just a suggestion, you may have already done rebores this way.  Frank
I have not done rebores that way, actually, that's a very helpful, and now that I think about it incredibly obvious, idea! haha, oh the things we don't think of ourselves... I don't do much machine work in general, just enough to keep things running.


Alright, I finished building my base! It went together pretty well, and is solid as a tank! I assembled all the boards, then used my belt sander to bring everything into flat, before sandwiching it with plywood. Luckily, I had all the long drill bits I needed from when I built my anvil and vise stands the first time 'round. Everything actually went pretty smoothly. I was a little worried when I put the hammer on the platform, as it was a little bit wobbly... but after sinking the 5/8" lag screws into it, she's solid as a rock! And it's all very easily picked up with my hoist, so mission successful! Now I'm going to eat some lunch, then go start fiddling with a motor mount...

BEHOLD! The world's most impractical surfboard!


Offline Twilight Fenrir

  • Hero Member
  • *****
  • Posts: 547
Re: Stop.... It's hammer time: New power hammer!
« Reply #47 on: August 14, 2016, 06:54:55 PM »
Whelp, the original idea I had for a motor mount is out the window.... My mount was thought up to be in the middle of my platform, but for some reason it didn't occur to me that the flywheel on the hammer is way off center. So I'll have to design up something else...

One of my friends has this little trolly for a motor... the motor sits on a little pad, and there's a screw like a vise on it that lets you crank the motor one way or the other... Gonna hafta do a little research into that...

Also, attempts at welding a pulley failed, it looks great, but it's not straight when spun. It's not surprising that my welding abilities aren't machinist grade :P So, I'm going to consider my options on that one... I've heard you can make one out of layers of plywood glued together, which is certainly interesting.... Or maybe I could glue/weld something 1/8" thick around the perimeter of Turnnut's pulley. Either way, I really need to fix my big drill press, and put a motor on my little one so I can be more accurate than hand drilling...


Offline oldgoaly

  • Hero Member
  • *****
  • Posts: 1485
Re: Stop.... It's hammer time: New power hammer!
« Reply #48 on: August 14, 2016, 07:24:12 PM »
looks good did you put a sealer on the wood?

A bunch of pics (5000+) of tools and projects in our shoppe
https://www.facebook.com/187845251266156/photos/?tab=albums

Offline Twilight Fenrir

  • Hero Member
  • *****
  • Posts: 547
Re: Stop.... It's hammer time: New power hammer!
« Reply #49 on: August 14, 2016, 07:45:20 PM »
looks good did you put a sealer on the wood?
No, I didn't... It's all treated lumber, so I'm not worried about rot... And, I don't really care that it's gonna soak up a ton of oil, will keep my floor clean :P

Huh, well these adjustable motor mounts are more reasonable than I would have guessed...

http://www.ebay.com/sch/i.html?_odkw=Adjustable+electric+motor+mount+204&_osacat=0&_from=R40&_trksid=p2045573.m570.l1313.TR0.TRC0.H0.XAdjustable+electric+motor+mount.TRS0&_nkw=Adjustable+electric+motor+mount&_sacat=0

But, wouldn't you know it, I've got a wonky sized motor... I bet I could fab up an adapter plate pretty easily though...
« Last Edit: August 14, 2016, 07:46:58 PM by Twilight Fenrir »

Offline Lewill2

  • Hero Member
  • *****
  • Posts: 1978
  • Bucks County PA
Re: Stop.... It's hammer time: New power hammer!
« Reply #50 on: August 14, 2016, 08:05:23 PM »
You could lag the drive pulley with conveyor belting or even leather.

Offline Twilight Fenrir

  • Hero Member
  • *****
  • Posts: 547
Re: Stop.... It's hammer time: New power hammer!
« Reply #51 on: August 15, 2016, 09:35:53 PM »
Well, it seems my hammer is the focus of another donation today... I had posted a wanted ad in a Blacksmith facebook page looking for a pulley, and one of the machinists there just cranked one out for me, exactly to spec for what I needed. Just asked that I pass on knowledge, which I do freely. I've had a few people come learn some basics, and always invite those who are interested to come try their hand at it.

Also, want to acknowledge Turnnut who offered me his pulley, but it's just slightly too small, and I really want to be spot on for the resonance frequency of this hammer...

Right now, I'm leaning towards one of these belts: http://www.ebay.com/itm/SOUTH-BEND-ATLAS-LOGAN-DRIVE-FLAT-BELT-3-16-X-2-1-2-CUSTOM-CUT-LATHE-Mill-etc-/291792261599?hash=item43f02c91df:m:mPes1NEBVmGCrvHD53kfZQQ

I think it will be a little easier to run the relatively small pulley with a composite belt than an original leather one.

I think I've figured out a small tweak to my motor mount concept that will make it work, I just need to go pick up another elbow and a small stub of pipe. Then, I need to swing by my local scrap yard and find a plate of steel to weld to the pivot, and mount the motor on.


Offline Twilight Fenrir

  • Hero Member
  • *****
  • Posts: 547
Re: Stop.... It's hammer time: New power hammer!
« Reply #52 on: August 18, 2016, 07:40:08 PM »
Well, progress hasn't been great, but it hasn't been stalled either. I've been throwing about an hour a day after work tinkering with bits and pieces...

I've got my new motor mount finished, and installed. It's made out of 1" sched. 40 Iron pipe, while I have a length of 1-1/4" pipe with a plate welded to it slipped over it so it can pivot freely. Actually bolting my motor to it is going to wait until my new pulley gets here, so i can be sure on the alignment.

Also made my power switch tower. Used an aluminum railing post for it, still have to notch the bottom so it will fit all the way on the platform, but it will do nicely. Have the hole drilled in the back for the metal-clad wire to come into it at the base, and will have a double-pole switch to turn it on and off... I almost bought a few awesome antique frankenstein-movie-esque switches at yard sales to mount on it... but in an emergency they'd be too difficult, so I'm going with a boring old toggle switch.

I believe I have all the parts for my hammer now, except for the belt, which I will order once I get my pulley and figure out exactly what length I need... I could probably finish it in the next weekend or two, if I didn't have an event to prepare for, and attend, so it's only going to get what spare time I throw at it for at least the next two weeks...


Offline turnnut

  • Hero Member
  • *****
  • Posts: 1861
Re: Stop.... It's hammer time: New power hammer!
« Reply #53 on: August 18, 2016, 08:39:42 PM »
 think about asking for a spare or two belt clip pins.

 will the motor turn in the right direction ? or will the hammer operate either way ?
« Last Edit: August 18, 2016, 08:47:38 PM by turnnut »

Offline gibsontool

  • Contributor
  • Hero Member
  • ***
  • Posts: 1469
Re: Stop.... It's hammer time: New power hammer!
« Reply #54 on: August 18, 2016, 08:53:18 PM »
I have a couple of rolls of belting that look very similar to what you want,might not be too practical to ship because I'm In Canada.
 These belts are new and have been in one of my sheds for many years,there yours for the cost of shipping.
  I'll take some pictures tomorrow, and some dimensions and get them posted. I'm going to be in Portland Oregon around the 10th of September. I can bring them down and send them from Portland which would be a lot less costly. From my experience this type of belt is used in sawmill applications for a slowdown belt behind the planer and on relatively steep inclines, I can't say I've ever seen these belts used for power transmission but  for what you need they are probably adequate. If memory serve me correctly they are about 5 to 6" wide and maybe 4 to 5 feet long. Talk to you tomorrow.

Offline gibsontool

  • Contributor
  • Hero Member
  • ***
  • Posts: 1469
Re: Stop.... It's hammer time: New power hammer!
« Reply #55 on: August 19, 2016, 02:42:07 PM »
OK I dug out the belting, have 3 rolls,all are 6"wide.One is 5' long and the other two are 9'- 2" long. The two long ones have the ends prepared for a vulcanized splice but clips would work fine. The label says they made by " Siegling " and they are for power transmission and conveyor belting. They are similar to the picture you posted, the high spots on the belt measure 1/4" and the valleys measure 5/32". Don't have a decent scale here but I would guess about 5 lbs. for a 9' roll.
 Having trouble getting the pics posted, I have posted pics before but I must be doing something wrong. I'm not too computer literate but my wife and daughter will be back soon and they got the know how.

Offline Twilight Fenrir

  • Hero Member
  • *****
  • Posts: 547
Re: Stop.... It's hammer time: New power hammer!
« Reply #56 on: August 22, 2016, 07:52:33 PM »
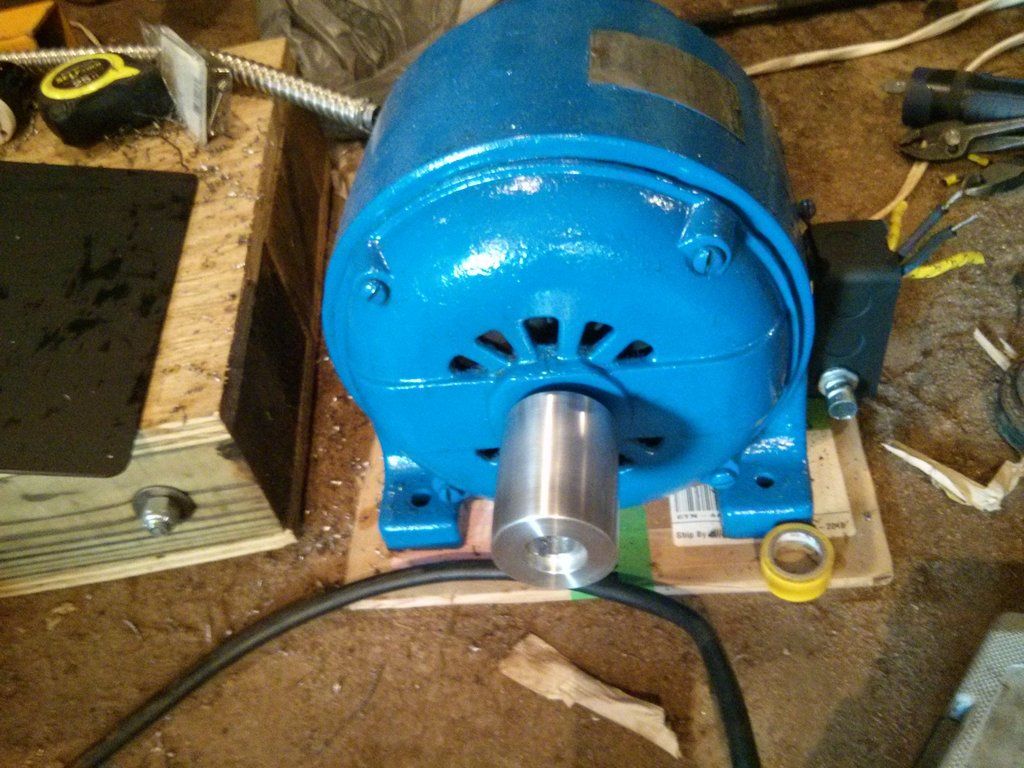
Sorry for the delay getting back on here, had a hectic weekend... My new pulley came today, and fits like a glove! It's incredibly well made. It's scary how light aluminum is though :P I got all of the bits of wiring assembled, just waiting to mount the motor before I make all the connections... Then I just need to make some adjustments to my dies, and thread a hole into the hammer head to keep it on the shaft, and it should be ready to go once I get a belt!

I also picked up THE portable forge I've been looking for forever, a Champion Blower & Forge no. 142! I've got an event this weekend, so my spare time for the next three days is going into crunch-rebuilding that baby. It's amazingly well preserved, all of the original bolts were still on it, and all but one unthreaded with nothing more than a crescent wrench...

think about asking for a spare or two belt clip pins.

 will the motor turn in the right direction ? or will the hammer operate either way ?
Well, I'm pretty sure I can make new pins if I need to...

I thought about that, but I honestly can't see how the direction of rotation would affect the operation of the hammer... The motor turns counter-clockwise when looking at the shaft.

OK I dug out the belting, have 3 rolls,all are 6"wide.One is 5' long and the other two are 9'- 2" long. The two long ones have the ends prepared for a vulcanized splice but clips would work fine. The label says they made by " Siegling " and they are for power transmission and conveyor belting. They are similar to the picture you posted, the high spots on the belt measure 1/4" and the valleys measure 5/32". Don't have a decent scale here but I would guess about 5 lbs. for a 9' roll.
 Having trouble getting the pics posted, I have posted pics before but I must be doing something wrong. I'm not too computer literate but my wife and daughter will be back soon and they got the know how.
Hmm... interesting... I wonder how hard it would be to cut that in half lengthwise.... I know I need about 6'-7', so it would have to be one of the long rolls. High spots and low spots? Is it serrated like a timing belt? o.o


Offline gibsontool

  • Contributor
  • Hero Member
  • ***
  • Posts: 1469
Re: Stop.... It's hammer time: New power hammer!
« Reply #57 on: August 22, 2016, 09:18:08 PM »
Here are the pictures I promised

Offline gibsontool

  • Contributor
  • Hero Member
  • ***
  • Posts: 1469
Re: Stop.... It's hammer time: New power hammer!
« Reply #58 on: August 22, 2016, 09:19:34 PM »
More pics

Offline gibsontool

  • Contributor
  • Hero Member
  • ***
  • Posts: 1469
Re: Stop.... It's hammer time: New power hammer!
« Reply #59 on: August 22, 2016, 10:01:15 PM »
Sorry it took so long,our internet was down over the weekend. The belt is easy to cut with a box knife and a straight edge, I used to have quite a bit more but I cut it up and used it for bumpers on my dock so I know it is easy to cut. These belts are sort of similar to a timing belt but you can see the difference in the pictures. You could try googling the manufacturer to get more info on the belts but the label does say it is used for power transmission so it should work fine. The manufacturer should give info as to what type of clips are best to use for splicing. Let me know if you want it before the end of August and I'll throw it in the truck and send it when we get to Portland. Sounds like one roll would give you two belts but you can have it all if you want it.
  Sure like to see some pics of the the new blower and forge when you have time. Jim
.